Who here has a birthday coming up!? If you do, HAPPY CAKE DAY to you!!! With having decorated two cakes in the past few months. And planning a huge 60th surprise Barbie princess party for my mom, I feel like I officially can say I have birthday brain. But, no matter how stressful planning a huge party might be – I always look forward to decorating the cake. And maybe it’s because I enjoy cake decorating with fondant. Since I am no pro-cake decorator and I think
I Love Making Cakes
I love birthdays (except for my own, I’ve been 29 and holding for a while now). I love planning parties, making and finding decorations, and creating birthday cakes. To me, it’s just another excuse to let my creative juices flow. Now, I’m not always Betty Crocker in the kitchen. But, every so often I’m able to channel my inner cake boss and whip up some pretty fantastic looking (and tasting) cakes! (Toot, toot – there goes my horn).
Cake decorating for me, is super fun. I use any excuse I can to create a cake. I decorate cakes for my kids, I decorate for my family, and I decorate for my friends! I ABSOLUTELY LOVE DECORATING CAKES! But it wasn’t always like this. One reason why I now like cake decorating so much is having discovered marshmallow fondant and how easy it is to use. You can find my go-to fondant recipe that I use, here!
Learn how to decorate a cake with fondant with my step-by-step instructions and photos below.
Learn How To Decorate A Cake With Fondant
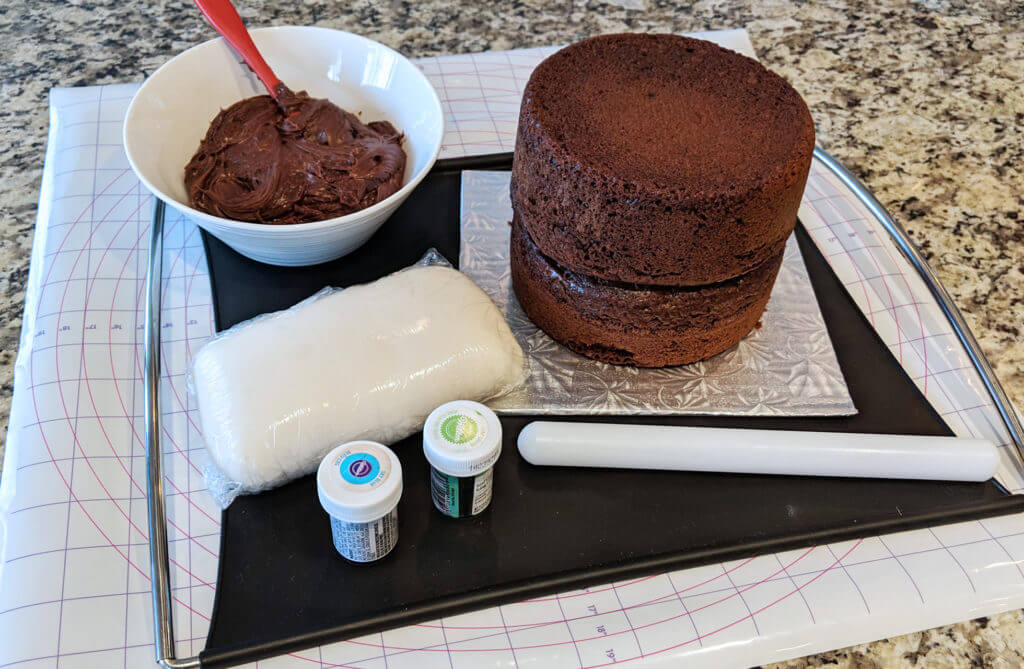
Make sure that you have the tools, supplies, and ingredients that are recommended to be able to successfully decorate a cake with fondant icing. Also, Crisco is a must (it didn't make it into the photo)
Center your cake on the cake base.
If the top of the cakes isn't flat after cooking, you will have to cut a small portion of the top off to make it flat. If you're stacking cakes to make your cake taller, put a layer of icing between the cakes.

Make sure that the bottom of the cakes becomes the top, as the bottom is the part that has conformed to the shape of the pan.
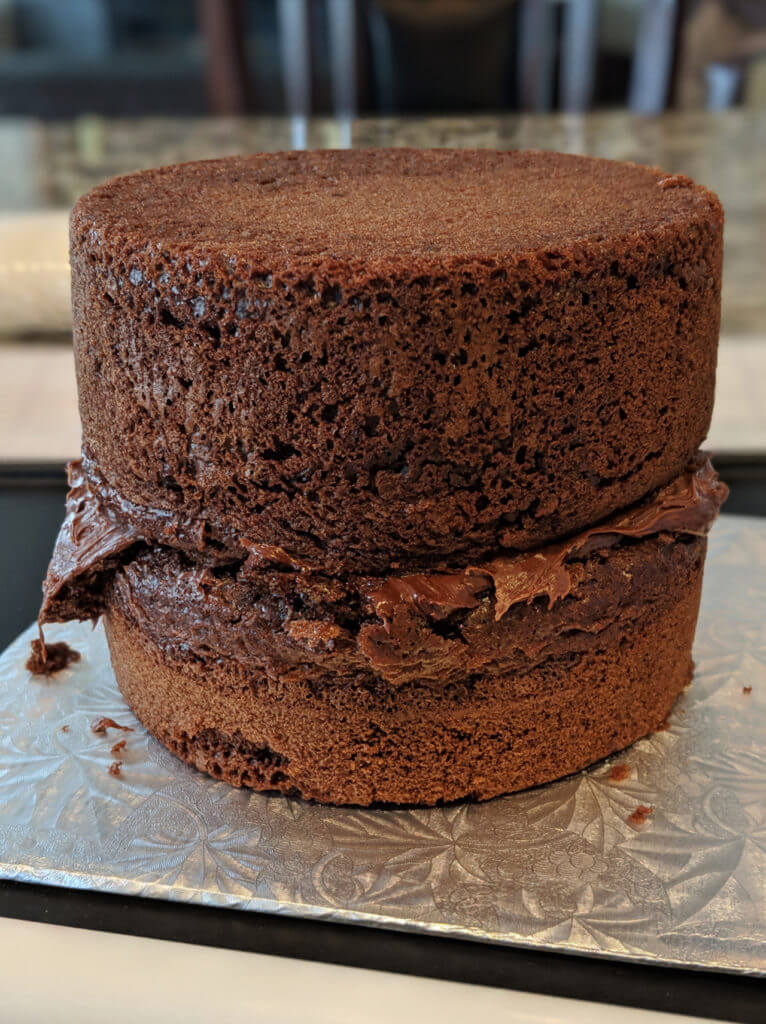
Apply a thin layer of icing to the top and side of the cake. The icing doesn't have to be perfectly smooth as the fondant will cover it, but also with that being said, try to make the layer of icing as even and smooth as you can.

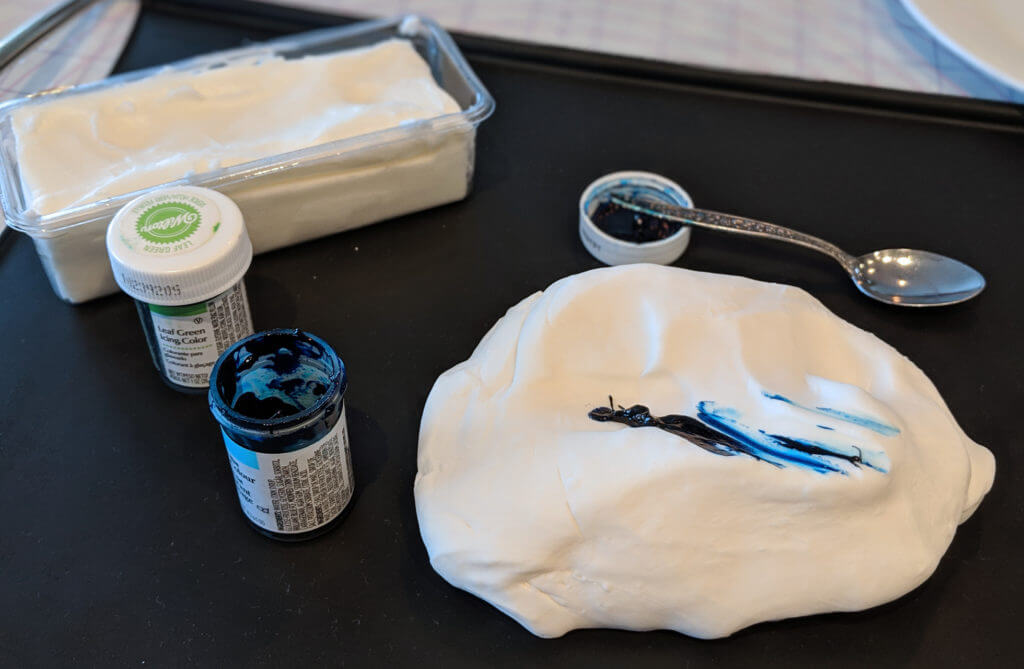
To create coloured fondant, take out only as much fondant as you are going to immediately work with to create one single colour. Make sure the remaining fondant is wrapped in saran wrap as it will dry out quickly. For example, to cover my 6" x 6" cake in the blue sky base colour, I used 1/2 brick of fondant from my marshmallow fondant recipe.

With a small amount of Crisco shortening on your hands work the fondant until it is pliable. If the fondant is really firm, you can put it in the microwave in 6-10 second intervals. Make sure to check for firmness (you should be able to easily push your finger into the fondant) before microwaving again. Be careful, because if the fondant gets hot enough it will start to melt. Also, be careful when handling the fondant when it first comes out of the microwave as it can be very hot.
Add the gel food colour to the fondant. If you want a lighter colour use less food colour, for darker colours use more.
* I prefer gel food colouring over liquid because the colours are more concentrated. Also, when using liquid colouring is can change the consistency of the fondant.
With a small amount of Crisco shortening on your hands knead and work the food colouring into the fondant. I find having a silicone mat or wax paper to knead the fondant on is helpful. Reapply the Crisco shortening to your hands as needed if you find the fondant too sticky.
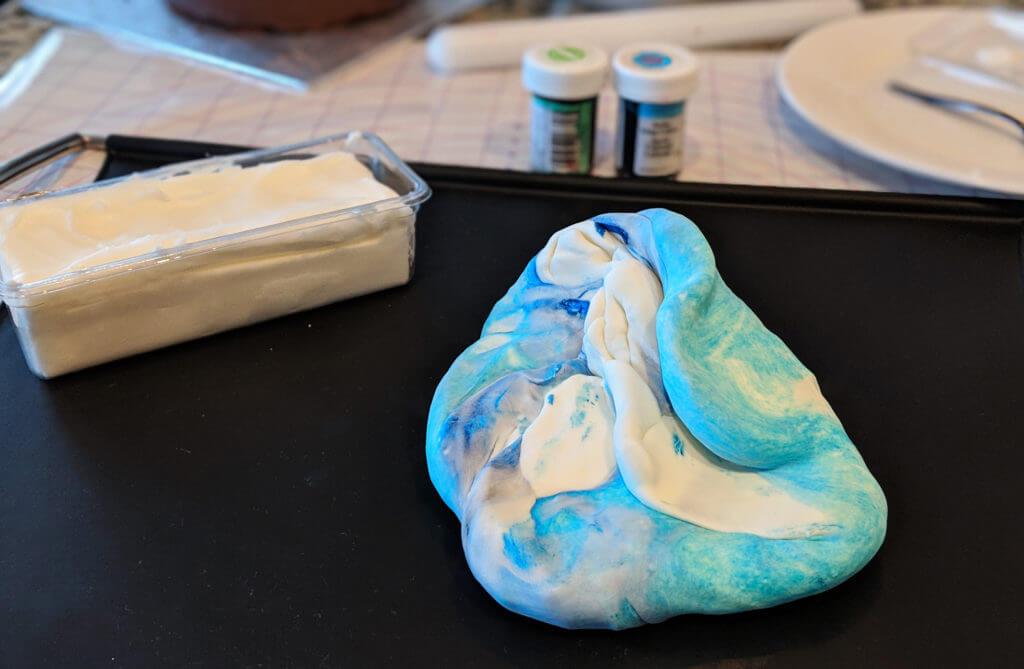
You can add more food colouring if you want your fondant darker, or you can add a different colour to change the tint. Once the fondant reaches the desired colour and has no more marbling it's ready to work with.

Roll your fondant out onto the roll and cut mat, or a piece of wax paper or parchment paper. Your fondant should be about 1/8" or slightly thicker. If your fondant is too thin it might tear.
I like using the roll and cut mat as it has guidelines on it which makes it easier to judge how big your sheet of fondant is.
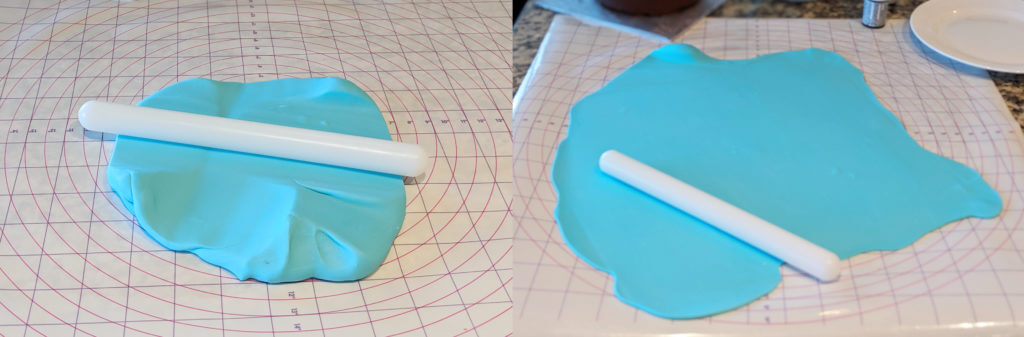
When trying to determine the size of your fondant sheet you need to cover a cake, measure across the top of the cake and down each side and add the measurements together.
I usually like to cut the fondant in the general shape of the cake - just to get rid of any excess areas so they don't get in the way.

Center the fondant and drape it over the cake. You can either do this by picking the sheet of fondant up. Or using the mat and flipping it with the fondant to apply it to the cake.
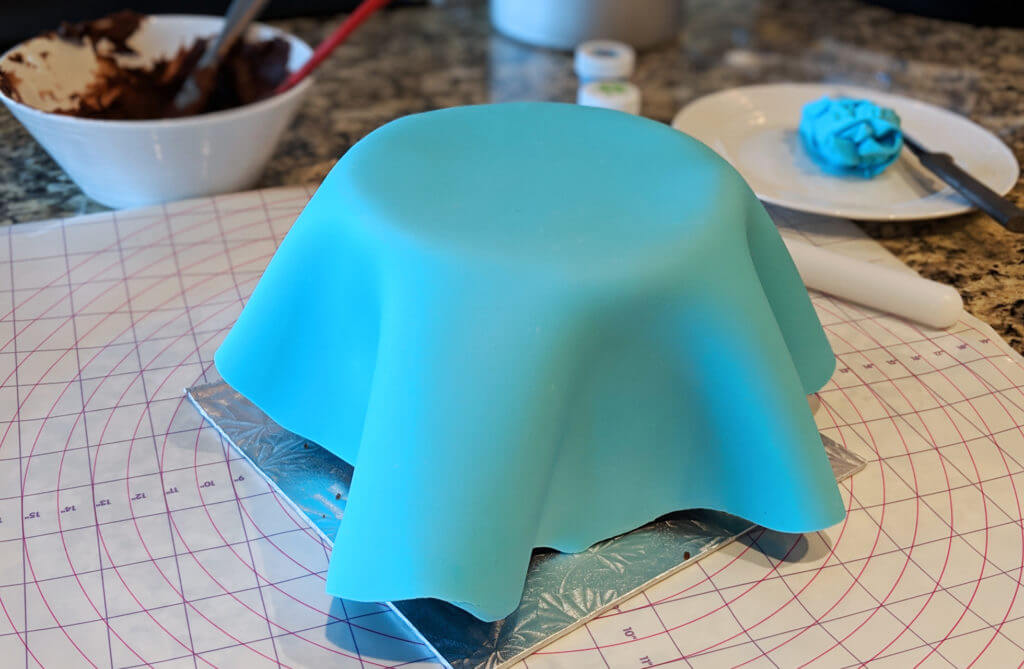
from the top of the cake, start to smooth the sides down. A fondant paddle works wonders to even out any bumps.
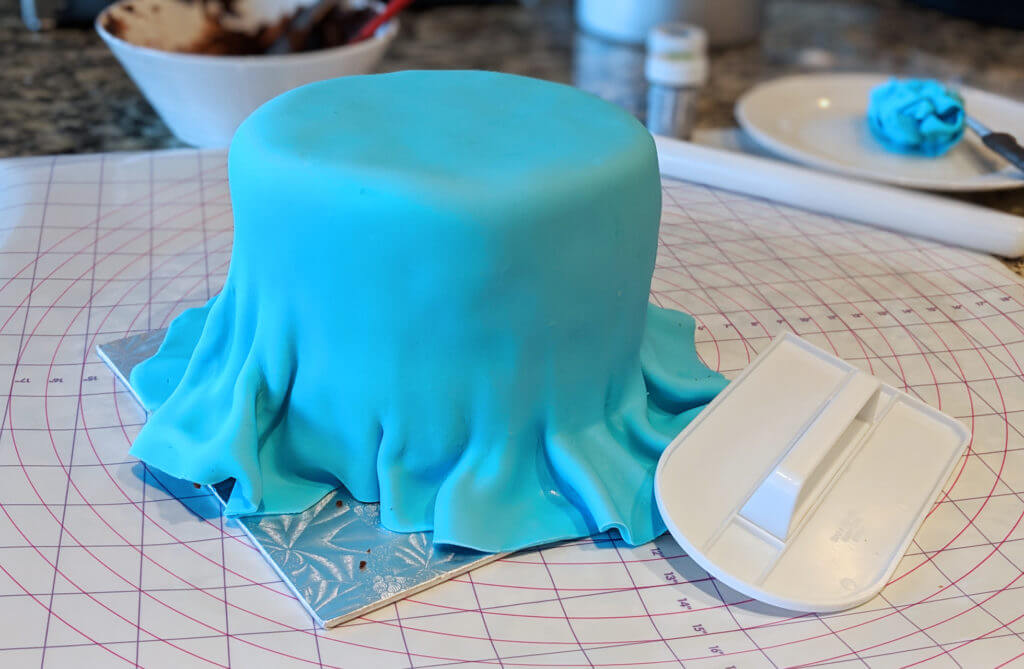
I find the easiest way to describe working with marshmallow fondant is like working with playdough. I can roll, cut, and model it into different shapes. When applying fondant on top of fondant I find running a little water over the back to the fondant your adding helps it stick better and stay in place.
* Again as a reminder, make sure to cover any fondant that is not being worked with in saran wrap.

Depending on the design of the cake, to finish off the base I like to add a thin row of piped icing or ribbon of fondant.
Now celebrate!

Ingredients
Directions
Make sure that you have the tools, supplies, and ingredients that are recommended to be able to successfully decorate a cake with fondant icing. Also, Crisco is a must (it didn't make it into the photo)
Center your cake on the cake base.
If the top of the cakes isn't flat after cooking, you will have to cut a small portion of the top off to make it flat. If you're stacking cakes to make your cake taller, put a layer of icing between the cakes.
Make sure that the bottom of the cakes becomes the top, as the bottom is the part that has conformed to the shape of the pan.
Apply a thin layer of icing to the top and side of the cake. The icing doesn't have to be perfectly smooth as the fondant will cover it, but also with that being said, try to make the layer of icing as even and smooth as you can.
To create coloured fondant, take out only as much fondant as you are going to immediately work with to create one single colour. Make sure the remaining fondant is wrapped in saran wrap as it will dry out quickly. For example, to cover my 6" x 6" cake in the blue sky base colour, I used 1/2 brick of fondant from my marshmallow fondant recipe.
With a small amount of Crisco shortening on your hands work the fondant until it is pliable. If the fondant is really firm, you can put it in the microwave in 6-10 second intervals. Make sure to check for firmness (you should be able to easily push your finger into the fondant) before microwaving again. Be careful, because if the fondant gets hot enough it will start to melt. Also, be careful when handling the fondant when it first comes out of the microwave as it can be very hot.
Add the gel food colour to the fondant. If you want a lighter colour use less food colour, for darker colours use more.
* I prefer gel food colouring over liquid because the colours are more concentrated. Also, when using liquid colouring is can change the consistency of the fondant.
With a small amount of Crisco shortening on your hands knead and work the food colouring into the fondant. I find having a silicone mat or wax paper to knead the fondant on is helpful. Reapply the Crisco shortening to your hands as needed if you find the fondant too sticky.
You can add more food colouring if you want your fondant darker, or you can add a different colour to change the tint. Once the fondant reaches the desired colour and has no more marbling it's ready to work with.
Roll your fondant out onto the roll and cut mat, or a piece of wax paper or parchment paper. Your fondant should be about 1/8" or slightly thicker. If your fondant is too thin it might tear.
I like using the roll and cut mat as it has guidelines on it which makes it easier to judge how big your sheet of fondant is.
When trying to determine the size of your fondant sheet you need to cover a cake, measure across the top of the cake and down each side and add the measurements together.
I usually like to cut the fondant in the general shape of the cake - just to get rid of any excess areas so they don't get in the way.
Center the fondant and drape it over the cake. You can either do this by picking the sheet of fondant up. Or using the mat and flipping it with the fondant to apply it to the cake.
from the top of the cake, start to smooth the sides down. A fondant paddle works wonders to even out any bumps.
I find the easiest way to describe working with marshmallow fondant is like working with playdough. I can roll, cut, and model it into different shapes. When applying fondant on top of fondant I find running a little water over the back to the fondant your adding helps it stick better and stay in place.
* Again as a reminder, make sure to cover any fondant that is not being worked with in saran wrap.
Depending on the design of the cake, to finish off the base I like to add a thin row of piped icing or ribbon of fondant.
Now celebrate!
Tools Of The Trade
Here are a few of tools that I use that I find make decorating a cake with fondant so much easier.
Below are a few of the cakes that I have created with fondant.

Monsters Inc. cake 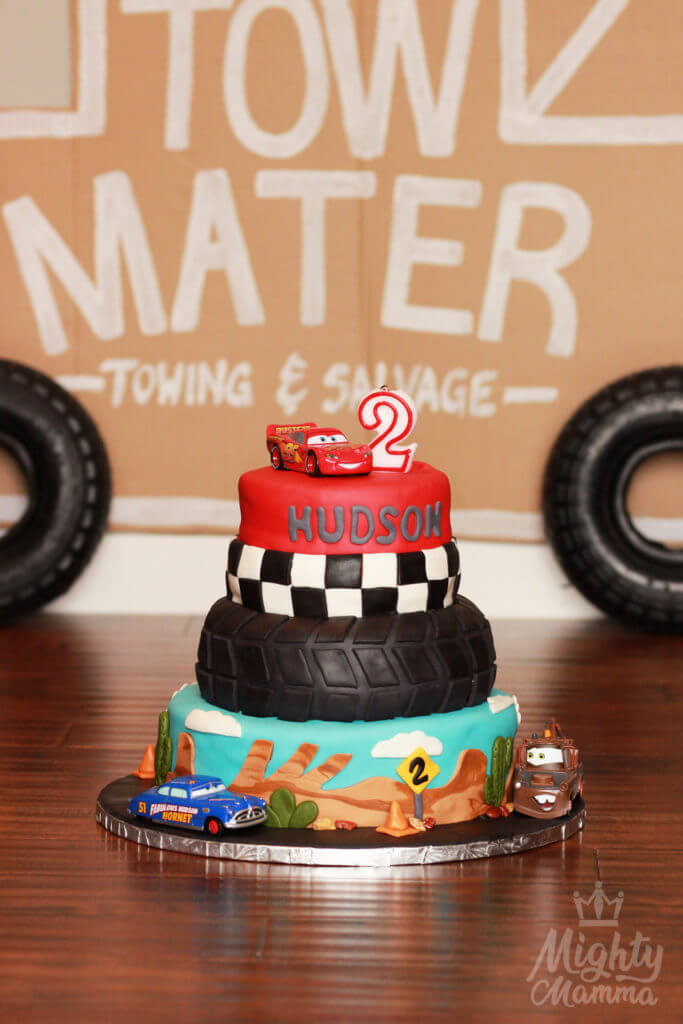
Cars cake 
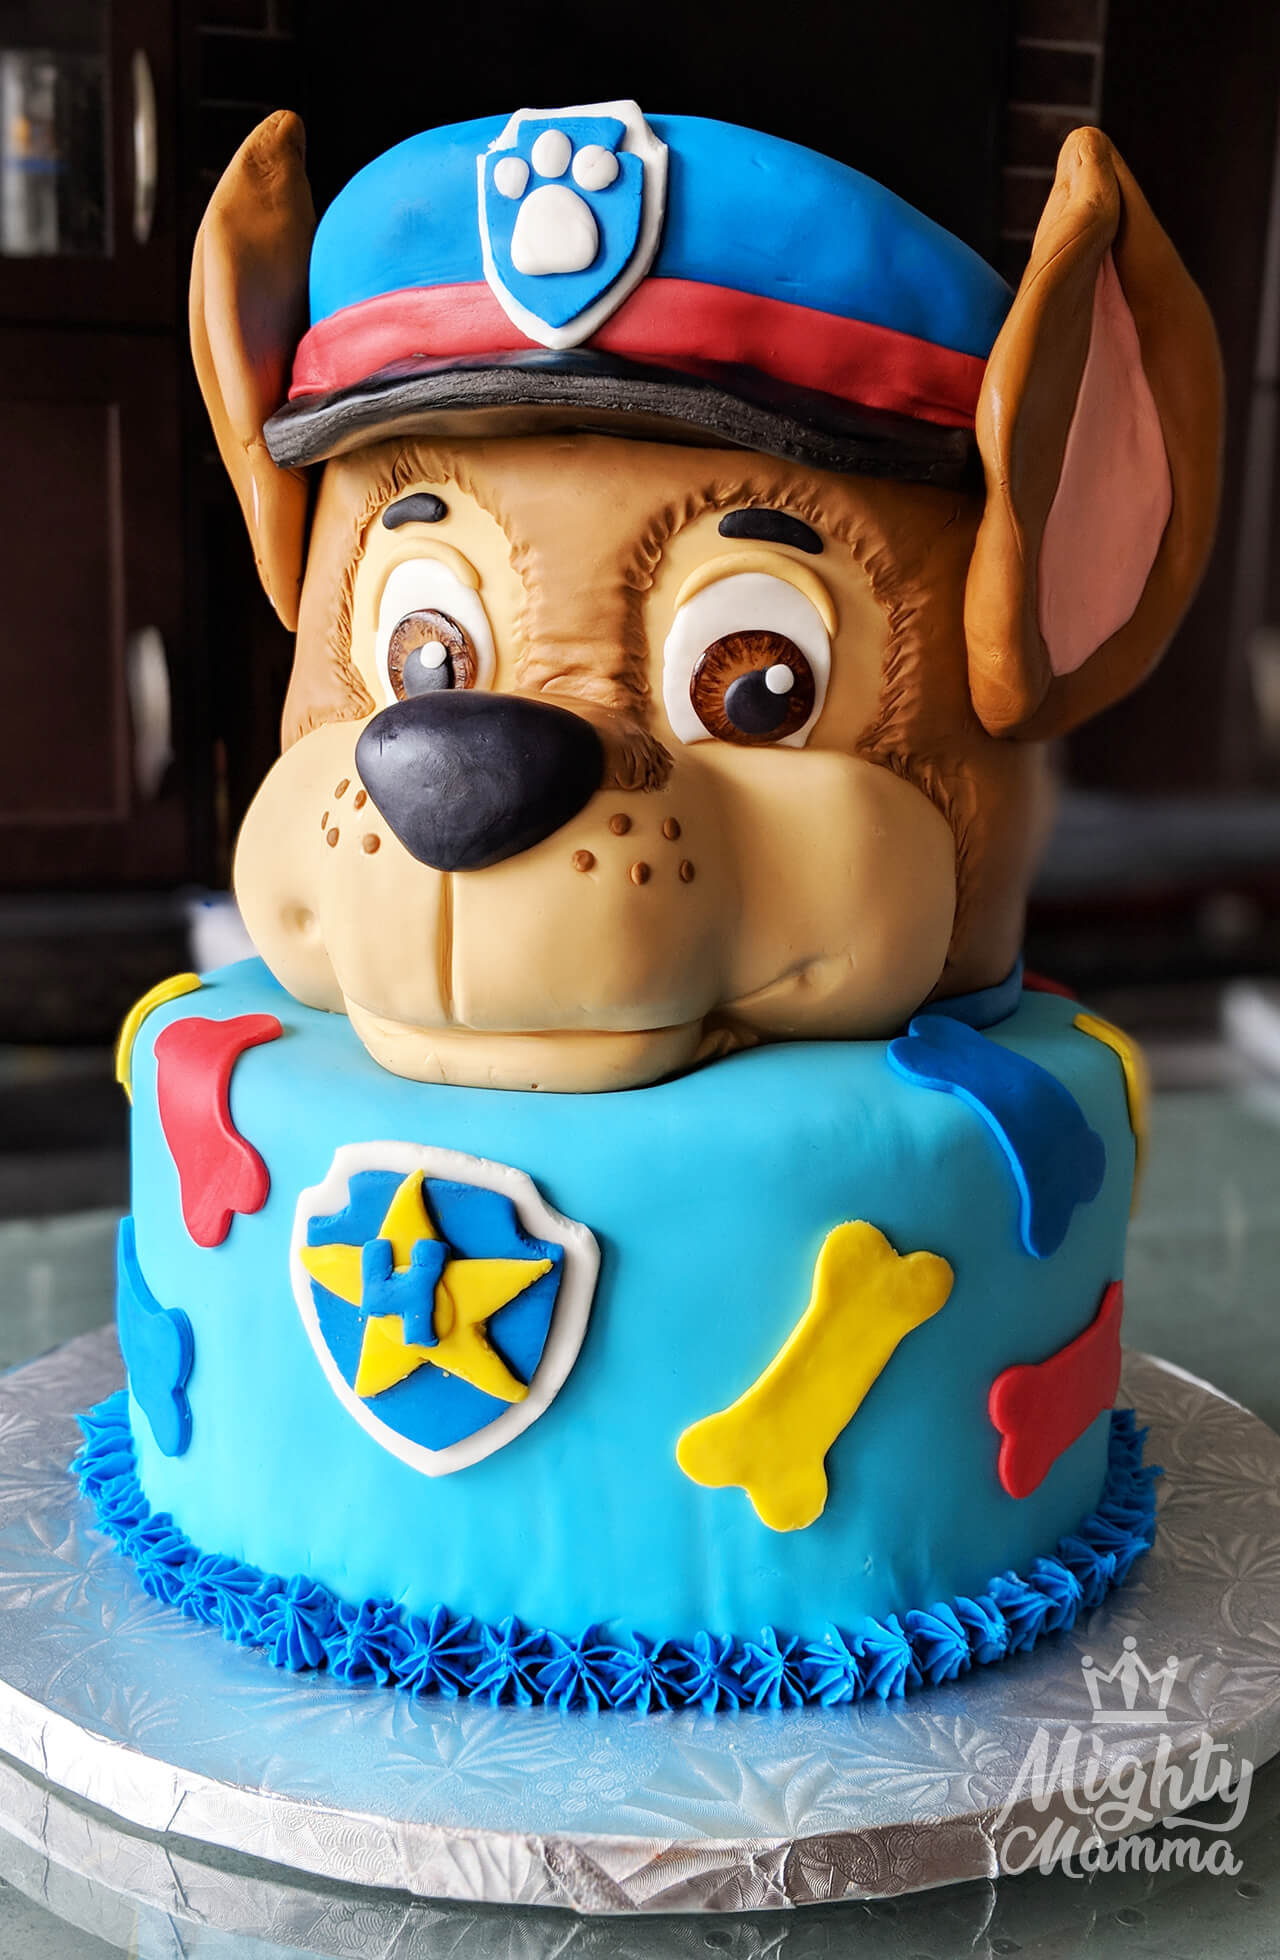
Chase Paw Patrol cake 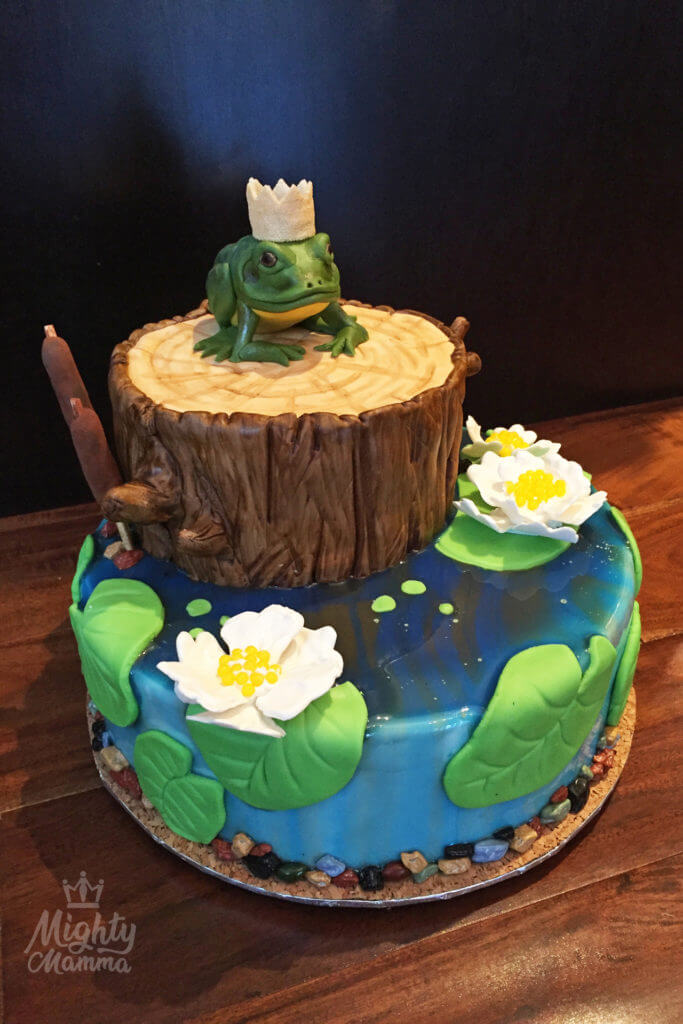
The Frog Princess cake 
Police cake 

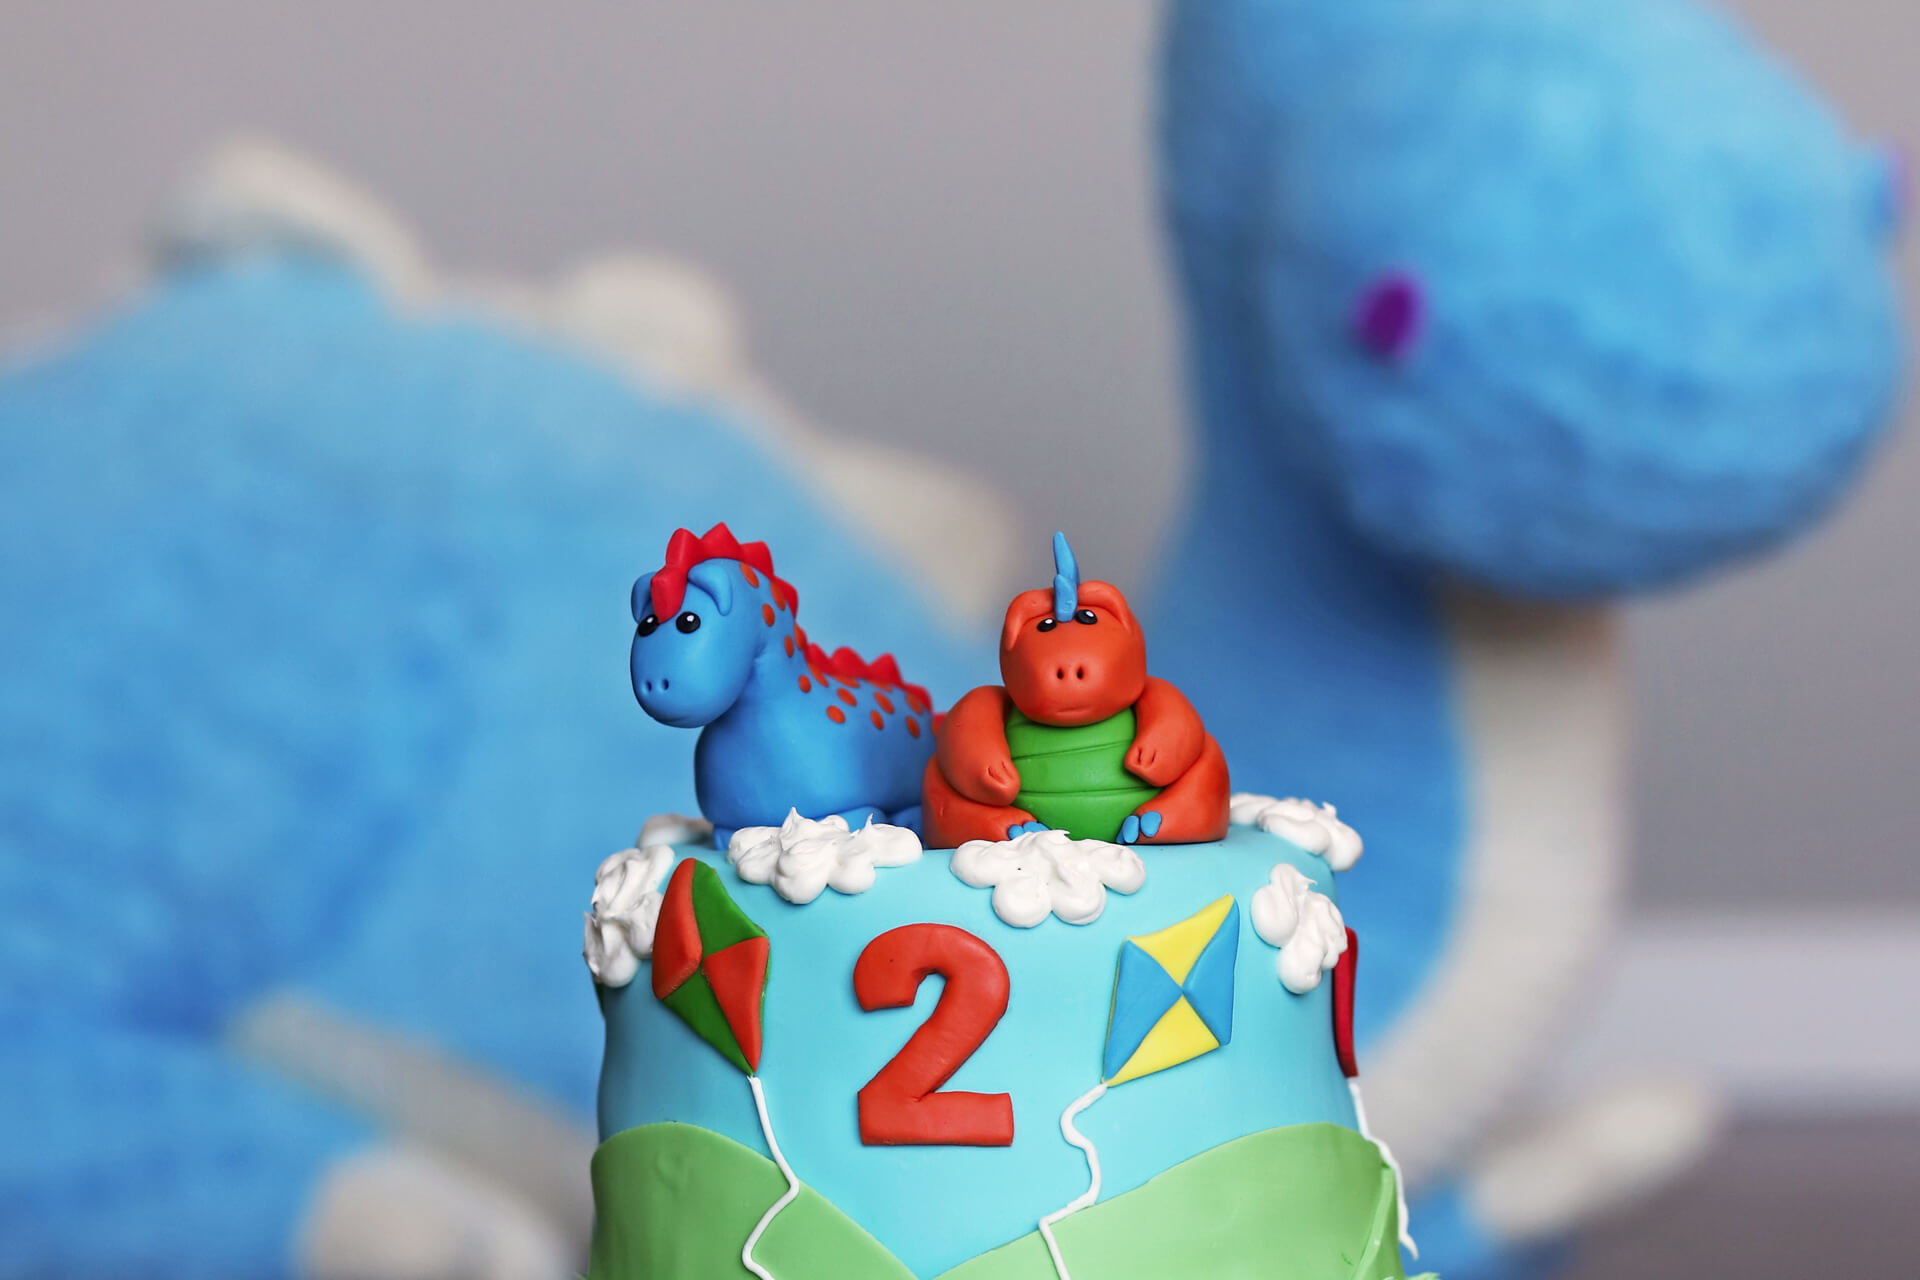
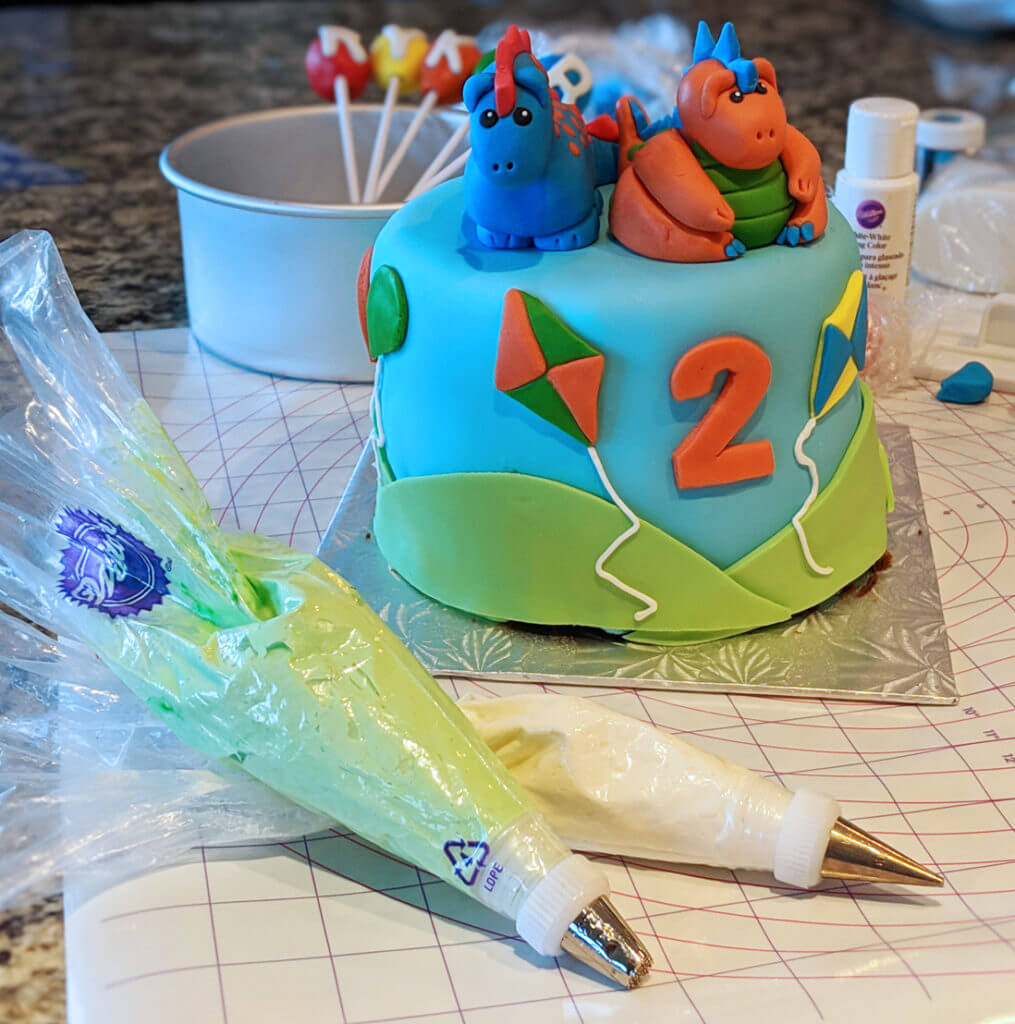
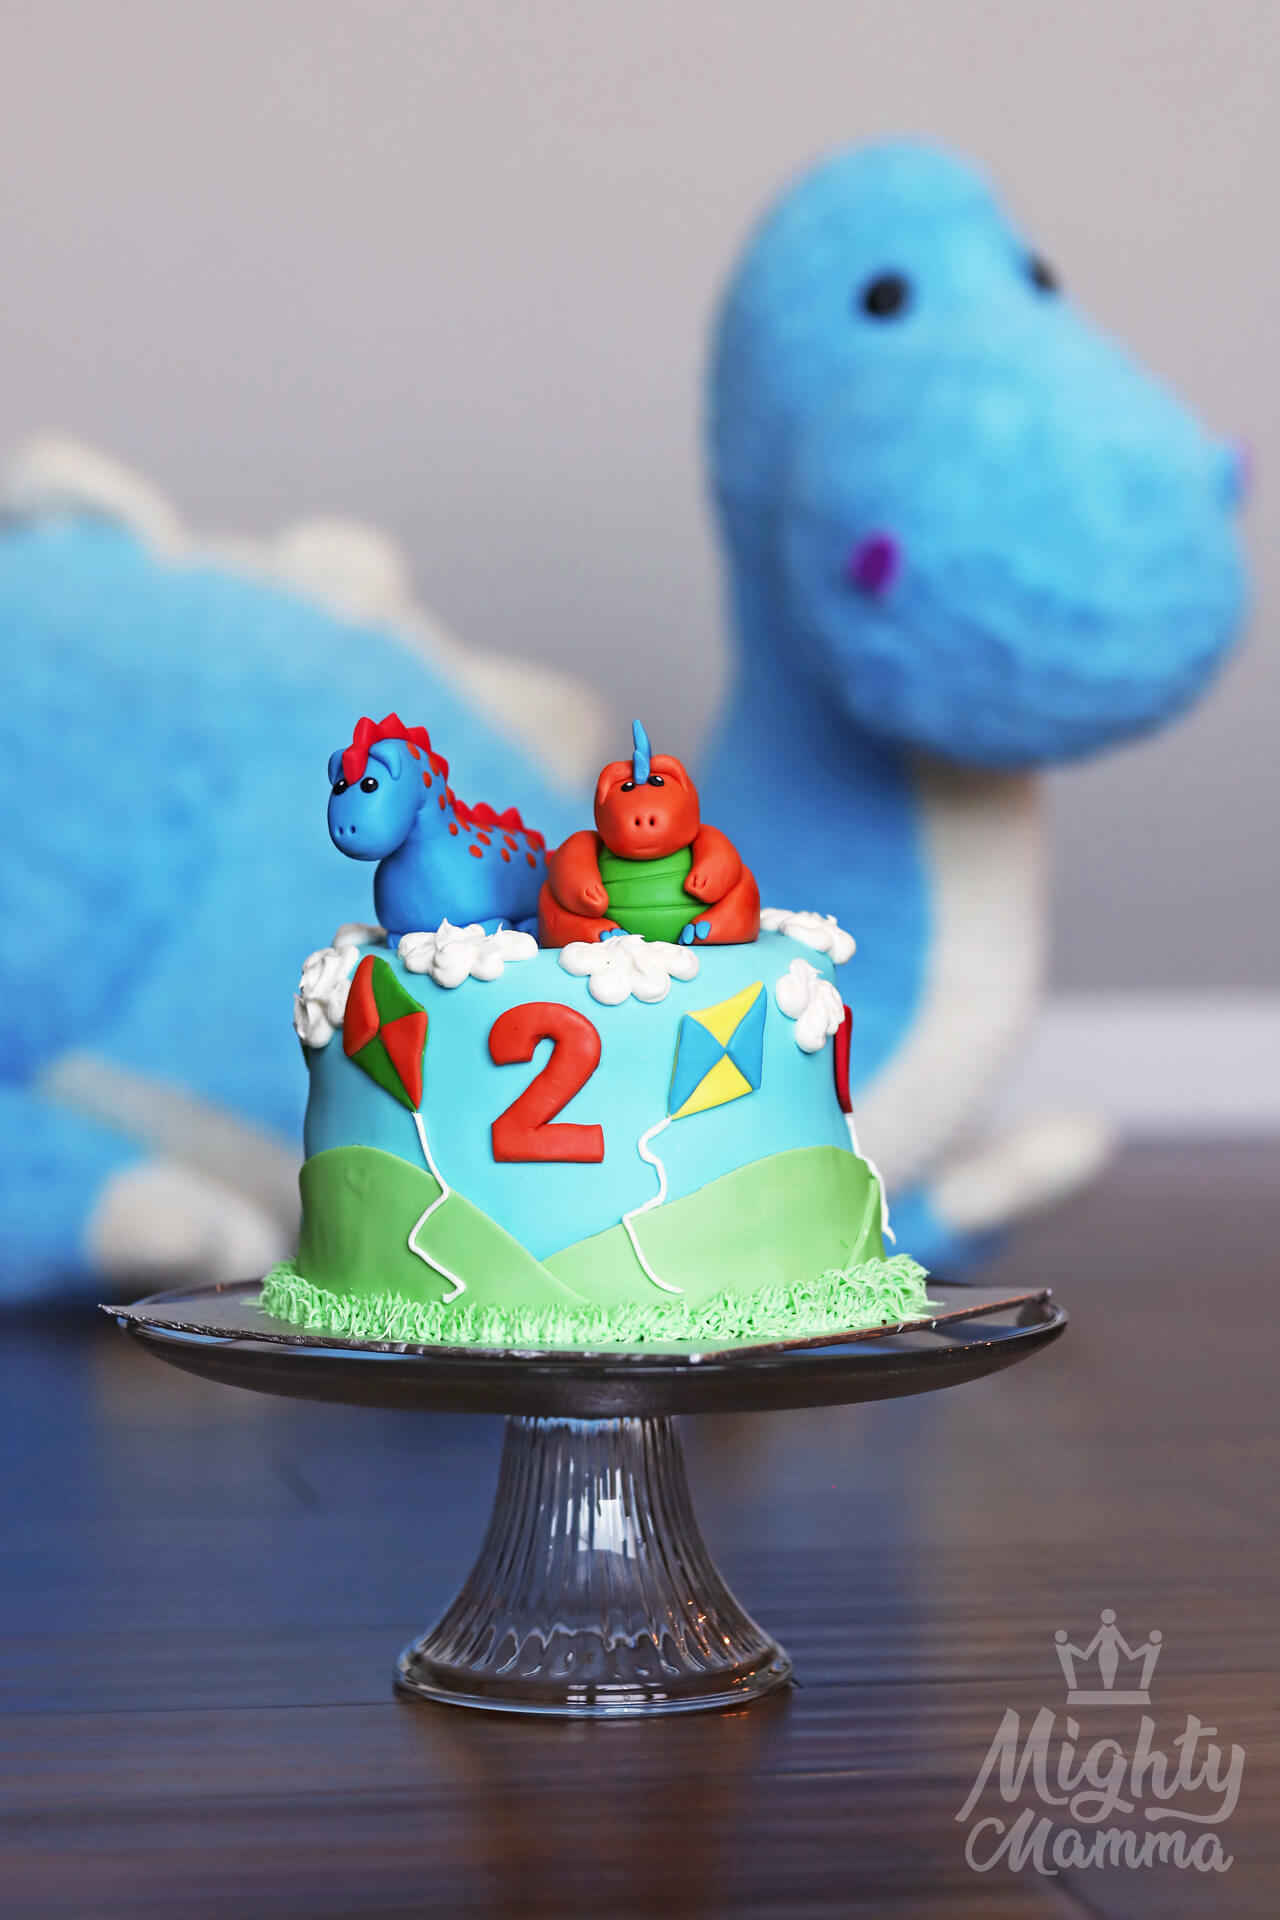
Wedding cake Dino cake 
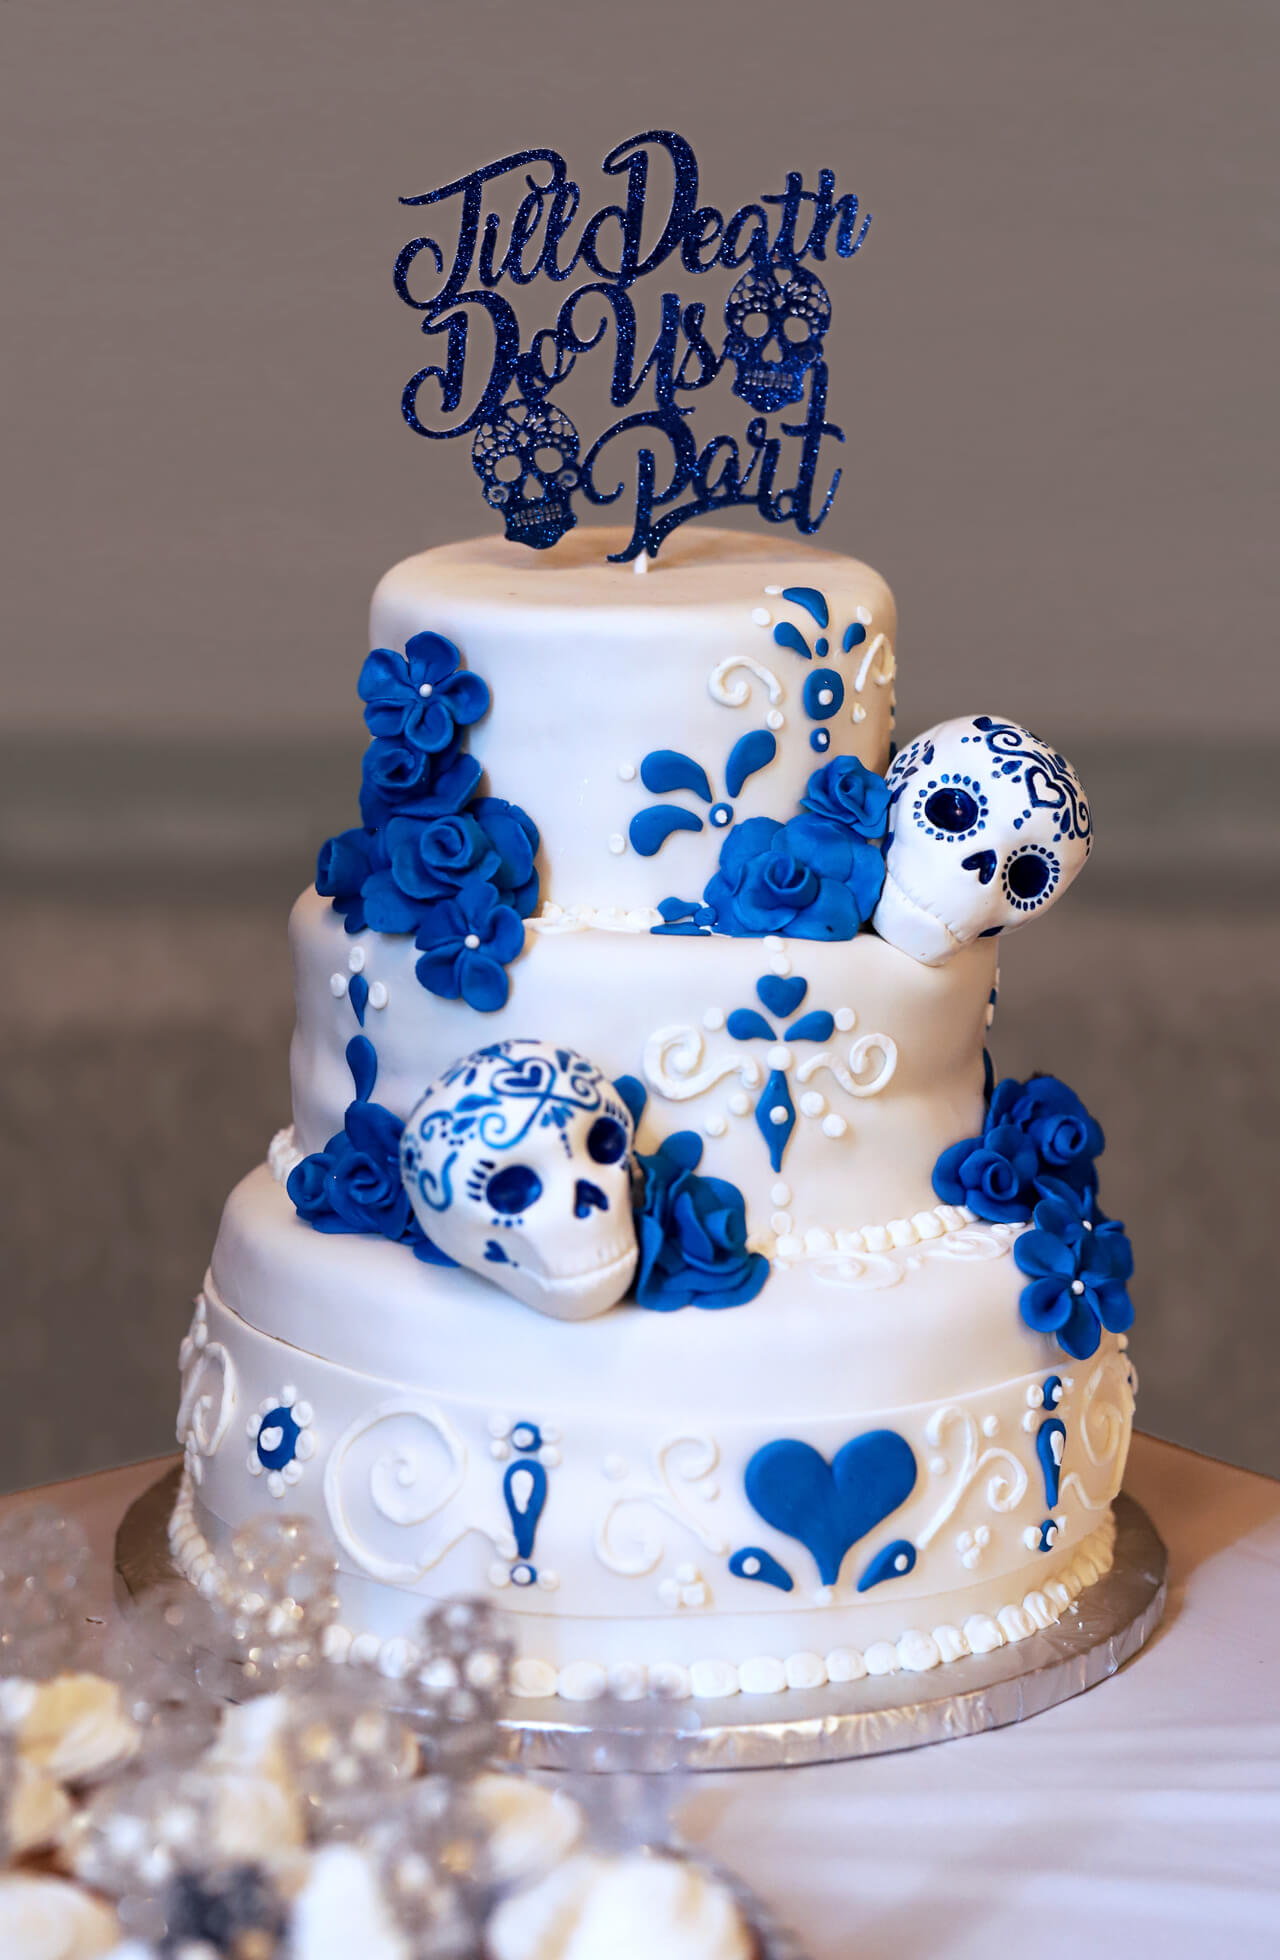
Sugar Skull Wedding Cake


I love to bake, but never got the fondant part of it down. Looks amazing maybe I will give it another go with the your how to. Thanks.
Thanks for reading, Lisa. I used to find fondant hard to work with too. The biggest part of being able to successfully decorate a fondant cake is using a good fondant recipe. Give the marshmallow fondant a try. I’m sure you’ll find it easier to use than your last try.
My daughters birthday is coming and I plan to make the cake for the party. I’m sure she would be very happy about it 🙂
Hi Fiorella! You’re daughter is a lucky girl to have her mom bake her a cake! Happy Birthday to her! I would love to know how your cake turns out.
Excellent idea… worth giving a try. And by the way.. loved the design on the cake. Keep sharing these wonderful ideas..
Thanks, Richa. I hope you give it a try. And thank you for the compliment.
These cakes are gorgeous! Your steps seem so easy to follow, makes me think maybe even I can do it!
Thanks, Vonetta! I truly believe that as long as you’re patient enough… you can decorate a cake – and of course, practice makes perfect. You just get better at it the more you do it!
This looks like so much fun to learn. I took a cake decorating class when I was a teenager with my mom. I loved every minute. I think I’ll give this a try.
It is so much fun! I absolutely love doing it. For me cake decorating is just another creative outlet to explore.
Omg I always wanted to decorate a cake. However I’m not a baker nor do I have the patience. I’m really jealous the cakes look amazing!
Hey Janay. Thanks for your comment. You are correct that you definitely need patience when decorating a cake… It does take a bit of time.
wow this is amazing. I am saving this for future reference. I hope to make a cake that looks a 1/3 that good one day!
Thanks, Mary! I hope my post makes cake decorating a little bit easier. In the end I hope you love making cakes as much as I do!
I’m always amazed at what people can do with fondant! I’m gonna need to start practicing so I can make cakes as pretty as yours.
Practice makes perfect! Thanks for the flattering comment!
What a great post! Beautiful pictures, too, and made this seem a lot less daunting!
Thanks, Erin! I think sometimes things can seem more complicated than they actually are – and I think this is one of them.