So, I have to admit that when I started my blog I wouldn’t have guessed in a million years that I would be creating a post on a DIY project that’s key components consisted of parts such as a chicken rotisserie motor and nerf football. But, here we are. I assume that there are stranger topics out on the net to blog about, so I think I’m still doing okay. Making a cup turner has been incredibly liberating for me creatively. I ALWAYS need to have a creative project on the go. And this has definitely fulfilled my addiction for creation. I never knew that I had so many ideas in my head that were fueled by modgepod, glitter, vinyl and resin… but apparently, I do!


What Is a Cup Turner?
Now some of you might be wondering, “what is a cup turner”? Well, a cup turner is a mechanism that holds a blank (a blank can be a cup, glass, bottle – basically whatever object you’re trying to add epoxy on). The cup turner holds the object and rotates it to allow epoxy resin to flow over the surface. By keeping the object continuously turning it allows the epoxy resin to level out and cure to a smooth finish.
How To Make My Simple No-Frills Cup Turner
There are so many different tutorials and videos out there on how to make a cup turner. After investigating them all, I decided that I just needed something simple that would do the job. Nothing fancy – a no-frills cup turner. And this is what I came up with.
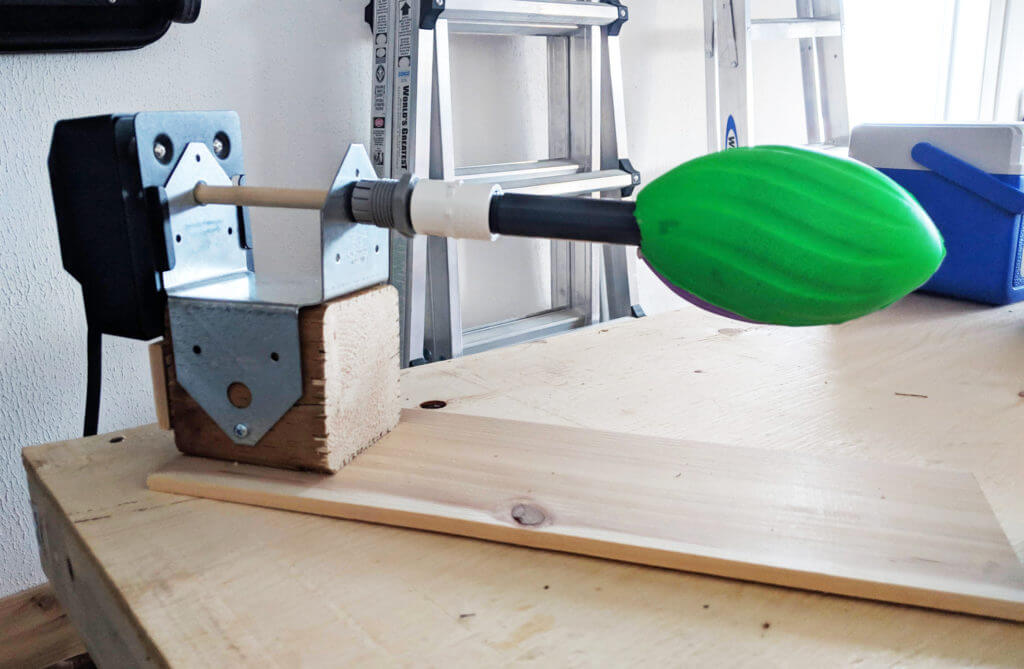
My very basic cup turner required very little cutting and was super easy to put together. I really like it because the rotisserie motor slides on and off and I didn’t have to tinker with trying to figure out how to secure the motor to a board. The total cost of my cup turner project was $55 (I used free scrap wood). And all the parts that I used were sourced from Amazon.ca and Home Depot. Click on the links to find exactly what I had used.
Required Tools
- power drill
- saw (Ideally a chopsaw)
- knife (something sharp to whittle wood)
Supplies From Amazon.ca (click on the name to see the product)
- 1 – rotisserie motor
- 1 – foam football
Supplies From Home Depot (Canada)
Click on the names to see the exact product I purchased. I also included the store SKU #’s to make it easier to find the items if you visit the stores. For my wood, I used scrap lumber. Because I needed such small pieces, a store clerk at Home Depot gave me some scrap offcuts of both the 4X4 and board. Which was nice so I didn’t have to purchase a whole piece.
For my American friends, and friends abroad, I think you might still be able to find some of these products at Home Depot or your local hardware store but I’m not sure what they are called or what the store SKU is.
- A small section of 4 X 4 post (I cut mine to about 3 5/8″ in length)
- Another small piece of board to use for a base (I used a board which was 1/4″ thick, 5″ wide by about 16″ in length)
- 1 – small piece of wood to use as a ledge for the motor
- 1 – 2 x 4 Deck Post Tie (ZMAX) (Store SKU # 707392634775)
- 1 – 1/2-inch x 12-inch PVC Riser, DBX (Store SKU # 1000117503)
- 1 – Hardwood Dowel 7/16 In. x 48 In. (Store SKU # 1000115247)
- 1 – Pvc Coupling (FIPT X FIPT) 1/2 inch (Store SKU# 1000145682)
- 1 package – PVC Threaded Strain Relief Connector 1/2 Inch (Store SKU # 1000184210)
- 7 – wood screws (about 1.5″ in length)
Step By Step Instructions On How To Build My Simple Cup Turner
Start by cutting the 4 x 4 post and the baseboard to the proper length. I cut my 4X4 post to 3 5/8" in length, and my baseboard to 16" in length. My little ledge board for the motor to rest on was cut to 2" by 3 1/2" in length.

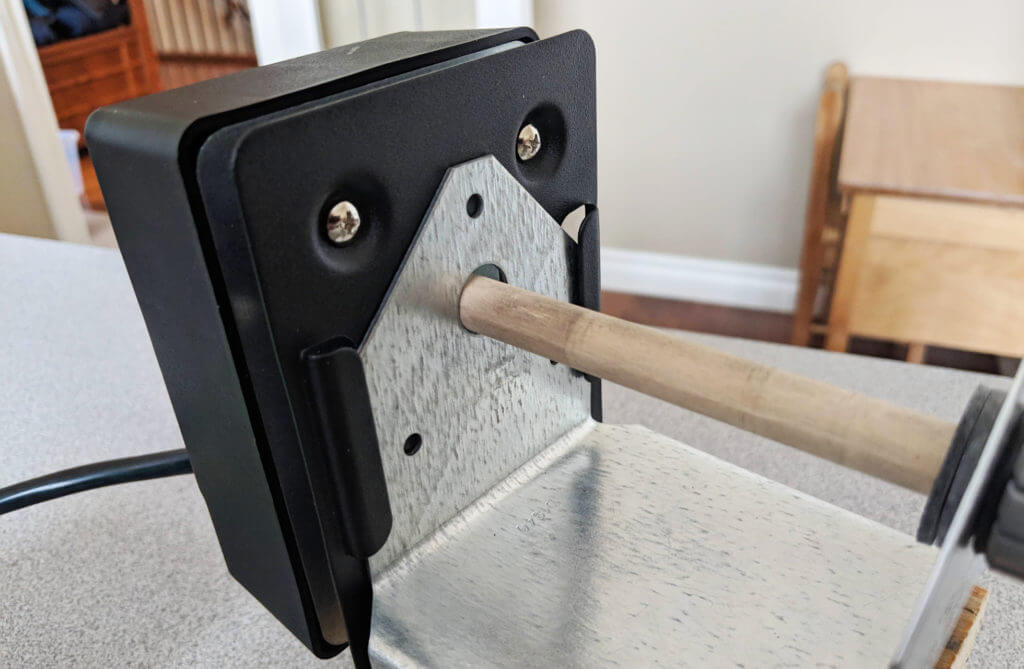
Screw the baseboard onto the 4 x 4 post (I used 3 wood screws). Attach the metal fence post bracket onto the 4 X 4 post. I used 1 screw on either side. They and make sure that the back of the metal bracket is flush with the back of the 4 X 4 post.
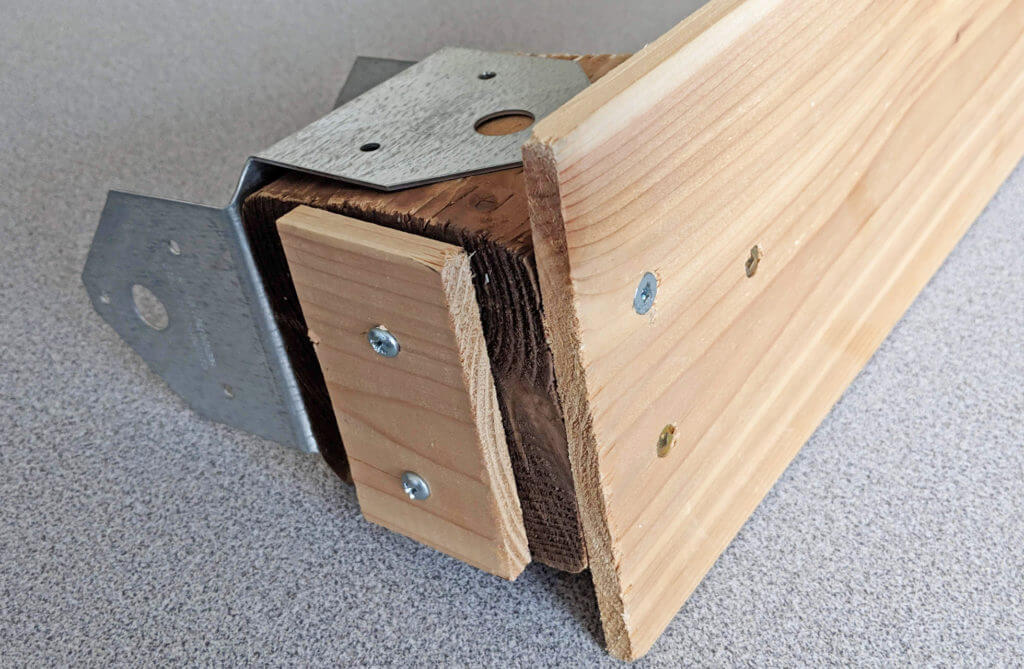
Screw the ledge board that will support the rotisserie motor to the back of 4 x4 post. To figure out the placement of the board, slide the motor onto the back of the metal bracket to see where the holes on the motor and the bracket align and screw on the ledge piece.

Whittle the end of the round dowel to be square shaped. The exact size of the square shape needed is 5/16''. I made sure my dowel fit snuggly into the hole, I achieved this by only whittling a bit off at a time.

Once you create a dowel with a square end that fits nicely, cut the dowel down to 7" in length.

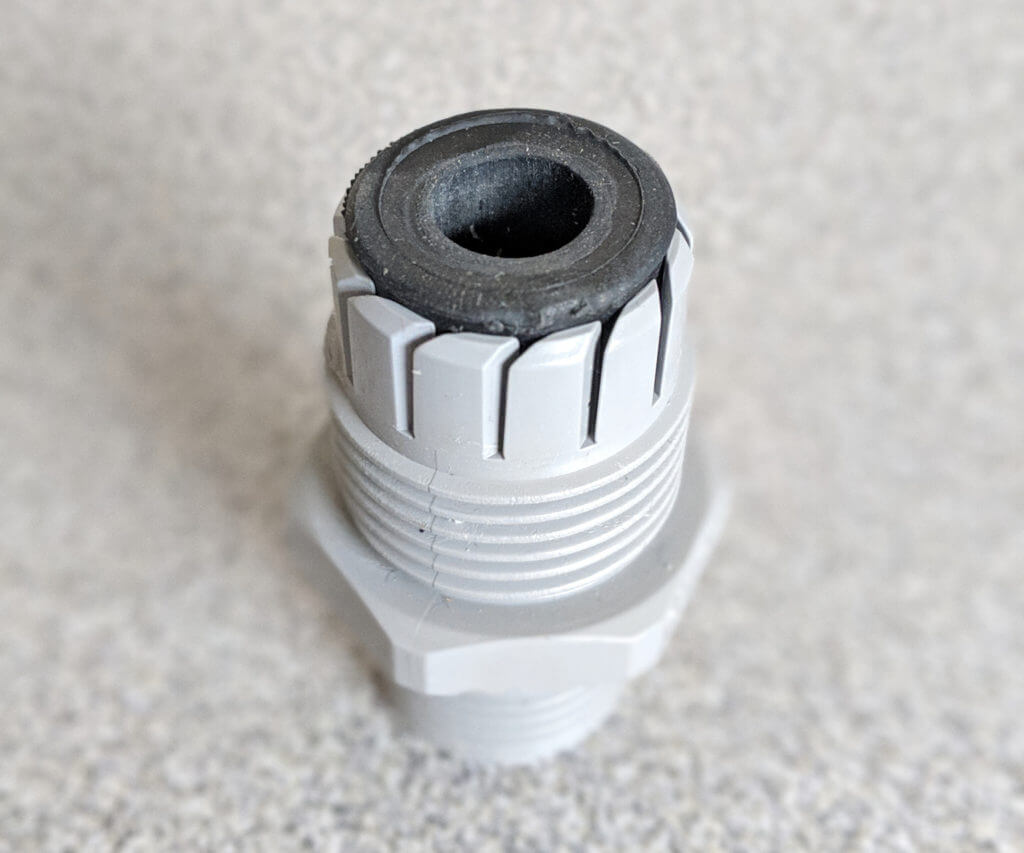
In the PVC Threaded Strain Relief Connector package, find the threaded grey piece that looks like the image, along with the rubber insert that has the round hole with fits over the round end of the dowel snugly (you might have to use a bit of force to get it over the dowel). Insert the rubber piece into the threaded piece as shown in the photo.
There are many pieces in the package that you won't need to use.
Push the plastic threaded piece with the rubber insert onto the round end of the dowel, as shown in the photo.
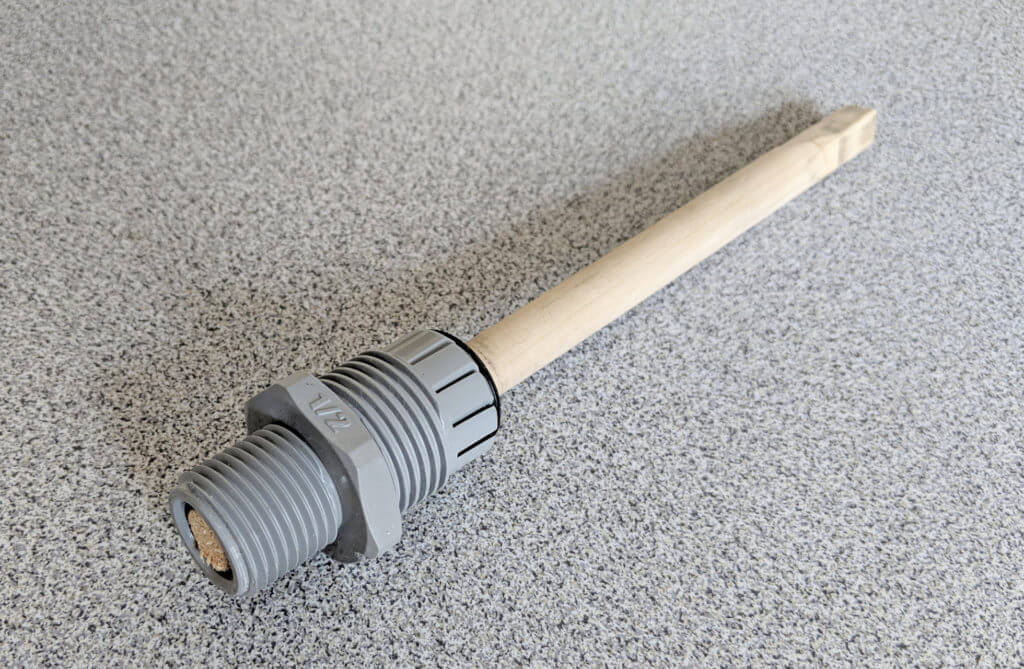
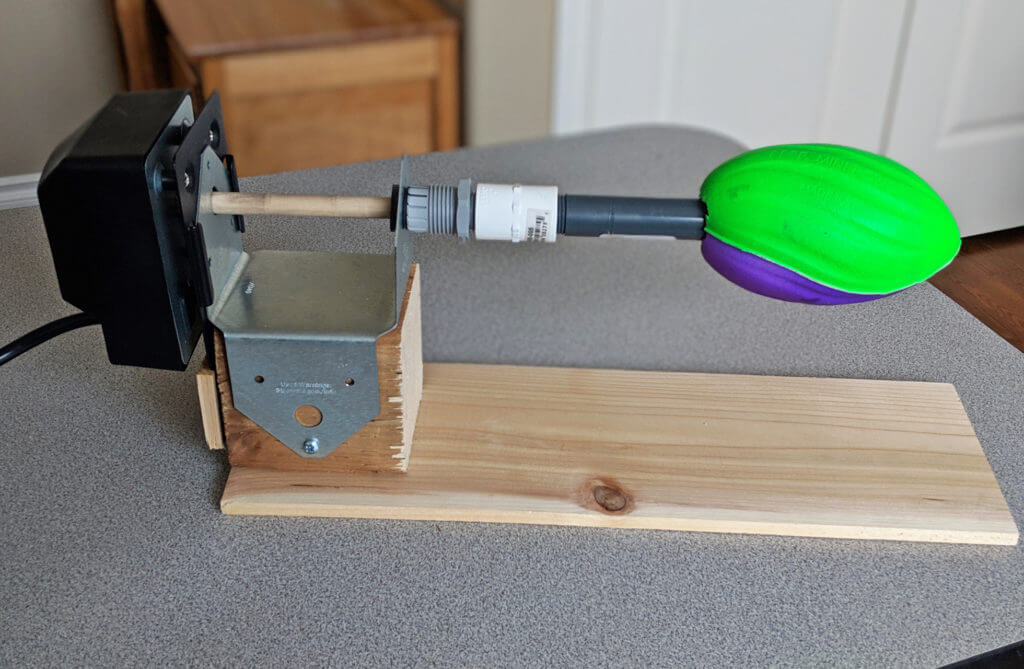
Screw the white PVC coupling part onto the end of the dowel with the grey threaded piece.

Slide the motor onto the metal bracket. put the dowel through the front hole on the metal bracket, put 2 rubber washers onto the dowel and push to the front of the bracket. Put the dowel through the back hole of the metal bracket and push it into the square insert of the motor.
To create the opening in the foam football, with a long knife I very carefully stabbed into the football at different angles to create an opening. (see my video as I demonstrate this using a pair of scissors).
Please take precaution when doing this so you don't cut through the football into your hand.

Cut the PVC double threaded pipe in 1/2. It worked out to be about 6" in length. Save the other 1/2 of the leftover pipe so in the future you can create another arm attachment to hold another cup.

Push the football onto the cut end of the PVC pipe. You can secure this with some sort of construction glue (ie: Gorilla glue) if you'd like. I just left mine unsecured and the pressure seems to hold the football onto the pipe tightly.

Attach the football arm onto the white threaded attachment. And you're all done!
When I use my turner, I also have a tin which is the same height as my arm that I put under the arm to support it when I have a cup on the end. I will show this when I demo making a cup.
Ingredients
Directions
Start by cutting the 4 x 4 post and the baseboard to the proper length. I cut my 4X4 post to 3 5/8" in length, and my baseboard to 16" in length. My little ledge board for the motor to rest on was cut to 2" by 3 1/2" in length.
Screw the baseboard onto the 4 x 4 post (I used 3 wood screws). Attach the metal fence post bracket onto the 4 X 4 post. I used 1 screw on either side. They and make sure that the back of the metal bracket is flush with the back of the 4 X 4 post.
Screw the ledge board that will support the rotisserie motor to the back of 4 x4 post. To figure out the placement of the board, slide the motor onto the back of the metal bracket to see where the holes on the motor and the bracket align and screw on the ledge piece.
Whittle the end of the round dowel to be square shaped. The exact size of the square shape needed is 5/16''. I made sure my dowel fit snuggly into the hole, I achieved this by only whittling a bit off at a time.
Once you create a dowel with a square end that fits nicely, cut the dowel down to 7" in length.
In the PVC Threaded Strain Relief Connector package, find the threaded grey piece that looks like the image, along with the rubber insert that has the round hole with fits over the round end of the dowel snugly (you might have to use a bit of force to get it over the dowel). Insert the rubber piece into the threaded piece as shown in the photo.
There are many pieces in the package that you won't need to use.
Push the plastic threaded piece with the rubber insert onto the round end of the dowel, as shown in the photo.
Screw the white PVC coupling part onto the end of the dowel with the grey threaded piece.
Slide the motor onto the metal bracket. put the dowel through the front hole on the metal bracket, put 2 rubber washers onto the dowel and push to the front of the bracket. Put the dowel through the back hole of the metal bracket and push it into the square insert of the motor.
To create the opening in the foam football, with a long knife I very carefully stabbed into the football at different angles to create an opening. (see my video as I demonstrate this using a pair of scissors).
Please take precaution when doing this so you don't cut through the football into your hand.
Cut the PVC double threaded pipe in 1/2. It worked out to be about 6" in length. Save the other 1/2 of the leftover pipe so in the future you can create another arm attachment to hold another cup.
Push the football onto the cut end of the PVC pipe. You can secure this with some sort of construction glue (ie: Gorilla glue) if you'd like. I just left mine unsecured and the pressure seems to hold the football onto the pipe tightly.
Attach the football arm onto the white threaded attachment. And you're all done!
When I use my turner, I also have a tin which is the same height as my arm that I put under the arm to support it when I have a cup on the end. I will show this when I demo making a cup.
As always, if you liked this post the biggest compliment you can give me is to leave a comment or share it with your friends. Also find and follow me on Facebook, Pinterest, & Instagram. If you like my blog and don’t want to miss any future posts, sign up to for
